Introduction to Blotting Techniques in Molecular Biology
by Pallabi Roy Chakravarty, Ph.D.

by Pallabi Roy Chakravarty, Ph.D.
https://app.monstercampaigns.com/c/yrirrqigyss1ydr...Blotting techniques are used to detect and analyze three types of biological macromolecules: DNA, RNA and proteins. Results of a blotting experiment tell you whether a macromolecule of a specific sequence is present in your sample or not. And, if it indeed is present, its abundance in the sample can also be quantified.
Specifically, Southern, Northern and Western blotting is done to analyze DNA, RNA and protein samples respectively.

Figure 1. Describes which blotting technique is appropriate based on the type of macromolecule. Western blot detects proteins. Southern blot detects DNA, and Norther blot detects RNA.
In daily life, when you have spilled a drink, you use a paper towel to absorb and soak up the spill.
Very similar to this, in molecular biology experiments, the macromolecule sample is blotted or transferred to a blotting membrane where further analysis is done.
In this article, we will first understand the principle of blotting, and how it is used in the analysis of biomolecules. We will also take a glance at the three main types of blotting – Southern, Northern and Western. Slight variations in these techniques give rise to few other blotting techniques, which are relatively uncommon. We shall also take a brief look at those.
Article Table of Contents:
Northern blot and its derivatives
Southern blot and its derivatives
Western blot and its derivatives
Outline of a typical blotting experiment
Developing the detection signal
Radioactive detection in blotting experiments
Three main types of blots are used regularly in laboratories. Western blot for proteins, Northern blot for RNA, and though not very common, Southern blot for DNA.
There can be slight variations to these blots, each for a specific experimental purpose. Below is a snapshot of the common blots, along with a brief description of each one’s objective.
Northern blot is for detecting specific RNA fragments in the sample.
It can be varied slightly as Northwestern (Northern + Western) for detecting protein-RNA complexes in the sample.
Think about an experiment where an RNA binding protein, along with its target RNA is being studied. This is where a Northwestern might become a handy experiment to do.
Southern blot is used for detecting DNA fragments of a particular sequence in the sample.
Southwestern (Southern + Western) is an optimized variation of Southern or Western blot to detect protein-DNA interactions in the sample.
Think about an experiment where a transcription factor is being studied. And the researcher wants to blot for the transcription factor protein bound to the promoter DNA. This is where a Southwestern will be an experimental approach.
Proteins are detected using Western blots.
As its derivatives for detecting protein-nucleic acid complexes, we have already mentioned Northwestern and Southwestern blots.
Dot blot is a Western or Northern or Southern blot without the electrophoresis step.
The sample is directly put on the membrane, without the preceding electrophoresis step, and then probed for the target.
A Dot blot is generally used as a quick method to see whether the target exists at all in the sample. If yes, then a Western/ Northern/ Southern blot is done for a more refined and quantifiable detection.

Imagine you have a sample of proteins or DNA or RNA. You want to find out whether a molecule of a specific sequence exists in your sample.

Figure 2. A
typical blotting experiment
A typical blotting experiment involves these 4 steps:
The first step in any blotting experiment is gel electrophoresis. In this process, proteins or nucleic acids are separated based on size.
One thing to note is there is a blotting technique that does not involve electrophoresis. This is called a dot blot.
For a more detailed understanding of gel electrophoresis of proteins and nucleic acids, we have two helpful resources:
At this stage, the specific DNA or RNA fragment, or protein you are assaying for will be resolved out from the remaining macromolecules in the sample – based on size. But you cannot quantitatively or even qualitatively detect it yet.
For this, you need to blot or transfer the electrophoresed sample from the gel on to a membrane. In a blotting experiment, this step is called transfer.
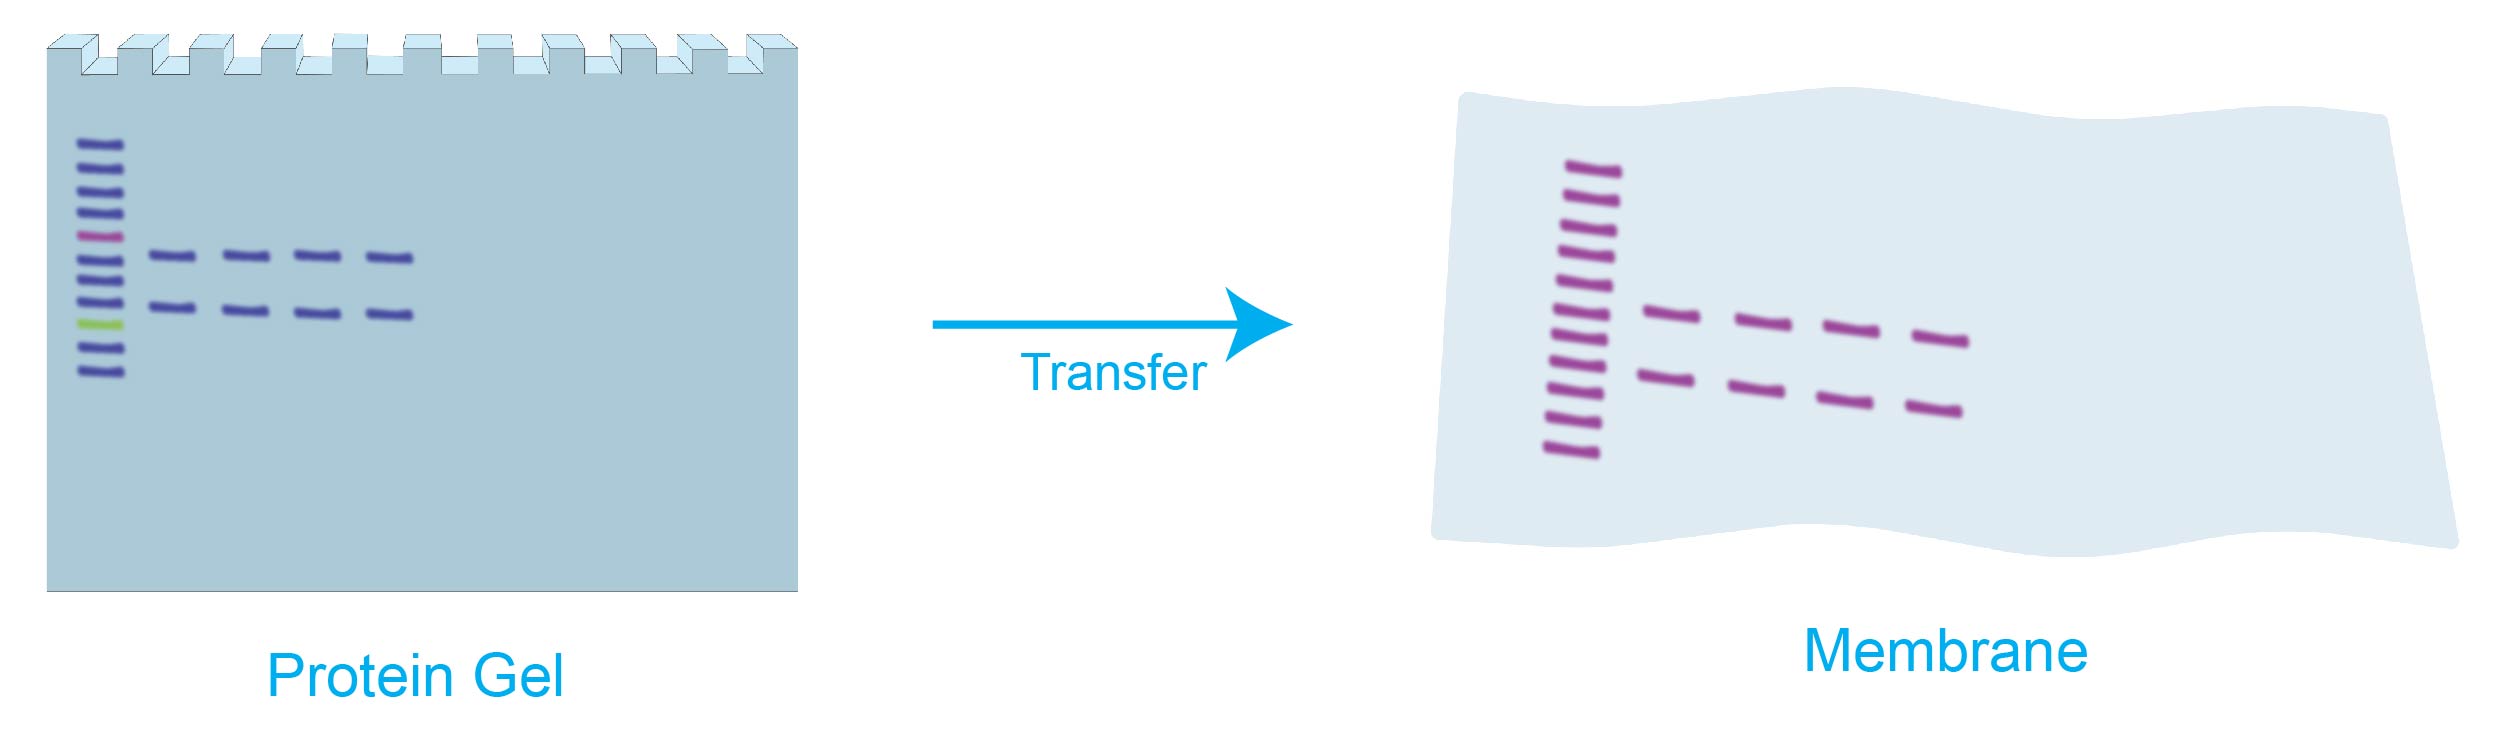
Figure 3. Following electrophoresis the sample is transferred or blotted onto a membrane from the gel for downstream analysis.
Just note: The protein bands cannot be physically seen until the membrane is developed. See below.
The blotting or transfer step is done using one of two physicochemical phenomena: capillary action, or more commonly electric current-driven mobility, which is called electroblotting.
Two approaches to the transfer step of a blotting experiment:
The working principle of capillary-based blotting is pretty much like an ordinary paper towel soaking up spilled orange juice.
The membrane in this case is like the paper towel. The macromolecules from the gel get soaked up onto the membrane by capillary action.
Just to make things clear, capillary action is the movement of a substance (DNA/ RNA/ proteins in this case) through a narrow space without any positive or negative forces like gravity acting on it.
One example we are very familiar with, and keep mentioning in this article, is how a paper towel draws up spilled juice.
With capillary blotting, the experiment is arranged so that the membrane is placed on top of the electrophoresed gel. Dry paper towels (that serve as blotting papers in daily life) are placed on top of the membrane along with a weight to aid in the blotting process.
Along with the liquid buffer (technically called transfer buffer), the electrophoresed macromolecule samples move from the gel to the membrane by capillary action.
However, once the actual samples reach the membrane, they get stuck to it and cannot get beyond the membrane onto the paper towels.
This is because the membrane is chemically modified to have a special affinity for the macromolecules, so that once the samples reach the membrane, they get stuck onto it.
In the end of the capillary blotting step, the paper towels are soaked with transfer buffer, and the samples remain immobilized onto the membrane surface. The transfer from gel to membrane is complete at this point.
Electroblotting means blotting or transferring the sample from the gel to the membrane with the help of an electric current. Here is the working principle.
Nucleic acids are negatively charged molecules. Also, in SDS-PAGE, the net charge on protein samples in the gel is negative – due to SDS treatment.
When negatively charged molecules like DNA/RNA/SDS-coated proteins are exposed in an electric current, they migrate towards the positive electrode. This phenomenon is used in electroblotting.
Following electrophoresis, the macromolecule samples lie in the gel. A membrane is placed on top of the gel.
This gel-membrane is sandwiched between two sponges and this sponge-gel-membrane-sponge cassette is placed between two electrodes so that the membrane is at the positive electrode side and the gel towards the negative electrode.
The whole setup is immersed with plenty of transfer buffer for the electric current to flow properly.
Due to the electric current, the macromolecule samples migrate, or are transferred, from the gel to the membrane.
This is just like what happens in capillary-blotting. Once the samples reach the membrane, they get immobilized onto it, due to special affinity of the membrane for the samples.
Probing in daily life means searching for something. What you search with is your probe.
Likewise, after the transfer step, the membrane is probed in order to detect the target nucleic acid or protein fragment.
In nucleic acid blots, like Northern blots or Southern blots, the probe is typically a single-stranded (ss) piece of nucleic acid that is complementary to your target fragment.
This single-stranded nucleic acid probe binds to the target nucleic acid fragment immobilized on the membrane due to nucleotide sequence complementarity.
Just to put things in perspective – adenine (A) is complementary to thymine (T) and uracil (U). Guanine (G) and cytosine (C) are complementary to each other.
Complementary nucleotides bind to each other through hydrogen bonds.
This binding of the probe to its target nucleic acid sequence is called hybridization as shown in figure 4.

Figure 4. Nucleic acid hybridization in a blotting
experiment. (Blow up shows binding of the probe to its target nucleic acid sequence)
For protein blots – Western blot and its derivatives – the probe is a primary antibody that detects its target polypeptide immobilized on the membrane.
In most cases of protein blots, the primary antibody probe bound to the target is detected with a secondary antibody probe that binds to the primary antibody.
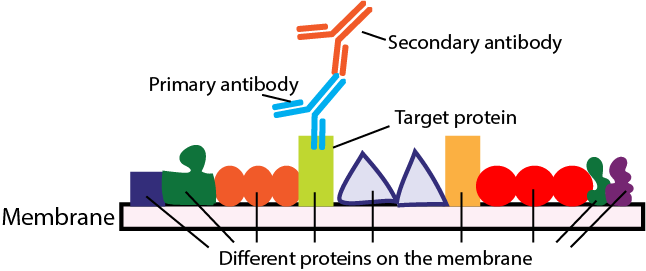
Figure 5. Probing in a Western blot
Keep in mind that though the probe detects and binds to the target on the membrane, you as an experimenter cannot yet see the detection. For this, you need to do a final step, which we’ll look at in the next section involving developing the detection signal.
Developing and detecting the signal for actual visualization of the target on the membrane is the final step in any blotting experiment. Simply put, the membrane is chemically treated so that the probe-bound target shows up on the membrane. This ensures that the experimenter can actually see it and draw inferences from that signal.
Here are the details.
For visualizing the target on the membrane, the probe has any one of the following detection systems associated with it:
While the first three detection methods have been described in detail in separate articles which you can read for reference by clicking the linked text above, here is a brief overview of radioactivity-based detection.
For radiographic detection, the probe is labelled or associated with a radioactive chemical. The probe, bound to its target on the membrane, gives out radioactive radiation that is captured on an x-ray plate for visualization of the target. This technique is known as autoradiography (figure 6).

Figure 6. Radioactivity based detection of nucleic acid blotting
Radioactive detection can be used in nucleic acid as well as protein blots. However, for safety reasons, radioactive detection has been largely replaced by chemiluminescence and fluorometric detection in the case of Western blots.
Radioactive detection, in regular laboratory practice, is nowadays mostly restricted to only nucleic acid blots – Southern and Northern blots. This is because of the hazards that are associated with handling radioactivity.
In these cases, the nucleic acid probe is labelled with the radioactive isotope of phosphorus - 32P (phosphorus-32) through which the probe emits radioactive signals.

Antibiotics and cell selection agents are used to isolate cells that contain a particular resistance marker from a mixed population. These powerful reagents are used...

During my undergraduate internship I was making different formulations of insulin nanoparticles that would, in theory, be delivered through an inhaler and into the lungs....

The cell selection agents puromycin, blasticidin, hygromycin and G418 kill prokaryotic and eukaryotic cells by inhibiting protein translation. Deciding which selection agent, and how much...

In the microscopic world, different species of bacteria and fungi are engaged in a never-ending turf war, fighting to defend their territory and to advance...