Easy Step-by-Step Antibody Purification Protocol with Protein A, Protein G, and Protein L Agarose Beads
by Simon Currie, Ph.D.

by Simon Currie, Ph.D.
In many articles, we’ve conceptually discussed Protein A, G, and L agarose beads and how purifying antibodies is one of their main uses. But sometimes it’s nice to be told exactly how to do something.
Take chocolate chip cookies for example. In general, I know what it takes to make chocolate chip cookies. But if I’m making them right this minute, I would need to look up a recipe to know the exact amount of ingredients and make sure I don’t get any steps out of order.
Protein A, G, and L agarose are used to purify antibodies. Antibody purification protocols include preparing the beads, loading the antibody solution, washing the beads, then eluting the antibodies from the beads and neutralizing the pH of the antibody elution.
In this article, we’ll walk through an antibody purification protocol step-by-step to lay out exactly how to do it.
Additional References and Protocols
This purification protocol will describe using a gravity-flow column to purify antibodies with GoldBio’s Protein A-, Protein G-, or Protein L-conjugated agarose beads. First, we’ll prepare the column, then we’ll load our antibody-containing solution, next we’ll wash the column, and finally we’ll elute our antibodies off of the column and pH neutralize the elution solution (Figure 1).
GoldBio’s, and most companies’ agarose beads are delivered as a slurry in 20% ethanol to prevent any microorganism from growing in the beads. If you’re planning on reusing the beads for additional purifications, it is a good idea to leave the beads in 20% ethanol when you’re done with this purification. But we want to get rid of the ethanol before we equilibrate our column in loading buffer.
GoldBio’s beads are in a 50% slurry, meaning it is half agarose beads and half 20% ethanol. So, if you want an agarose column volume of 10 mL, for example, then you should load 20 mL of slurry into the column.
1. Invert bead slurry in container to homogenize the bead mixture and pour desired volume into a gravity-flow column.
2. Let the 20% ethanol solution drip out of the column and into a beaker or other container.
3. Rinse with ~5-10 column volumes (CVs) of deionized water (dIH2O).
4. Rinse with ~5-10 CVs of load buffer.
You can discard all buffers collected during this step because you won’t need them anymore.
After the agarose bead column has settled in the plastic column, you will want to add additional solutions as gently as possible by pipetting down the side of the column. See this video for a demonstration of this technique.

Figure 1.
Purification of antibodies. Antibodies bind to agarose beads conjugated with
interacting partner molecules such as protein A, G, or L (column 2). After
washing, antibodies are eluted with an acidic pH elution buffer that weakens
the interaction between the antibody and protein A (column 3).
5. Set aside a very small volume (~30 mL) of the antibody solution for further analysis.
6. Add the rest of the antibody solution by gently pipetting down the side of the plastic column. Collect the flow-through and save for later analysis.
7.*Optional* - If desired, you can take the flow-through and put it back over the column one more time to give your antibodies additional time to bind to the Protein A, G, or L agarose beads. This may increase your yield a little but will take additional time. If doing this step, set aside 30 mL of the first flow-through and save the second flow-through for further analysis.
Table 1. Example buffers for antibody purification with Proteins A, G, and L.
|
Step |
Buffer |
|
Load / Wash |
1 x PBS pH 7.4 |
|
Elution |
0.1 M Tris-Glycine pH 3.2 |
|
Neutralization |
1 M Tris pH 9.0 |
8. Gently pipet ~5-10 CVs of wash buffer down the side of the plastic column. Collect the wash in a different container from the flow-through and save for further analysis.
9. Gently pipet ~5-10 CVs of elution buffer down the side of the plastic column. Collect the elution in a different container from the flow-through, and wash and save for further analysis.
10. Add neutralization buffer to your eluted sample to bring the pH to a more neutral value – typically pH 6 to 8.
At this point you’ve purified your antibody. Now you’ll want to analyze the purification to see how it went.
11. Run an SDS-PAGE gel using the load, wash, elution, neutralization, and bead samples.
12. Quantify your neutralized elution sample by measuring the absorbance of the solution at 280 nm wavelength of light, or by doing a Bradford assay.
The SDS-PAGE gel will give you a quantitative sense of how the purification went and may help answer some of the following questions (Figure 2):
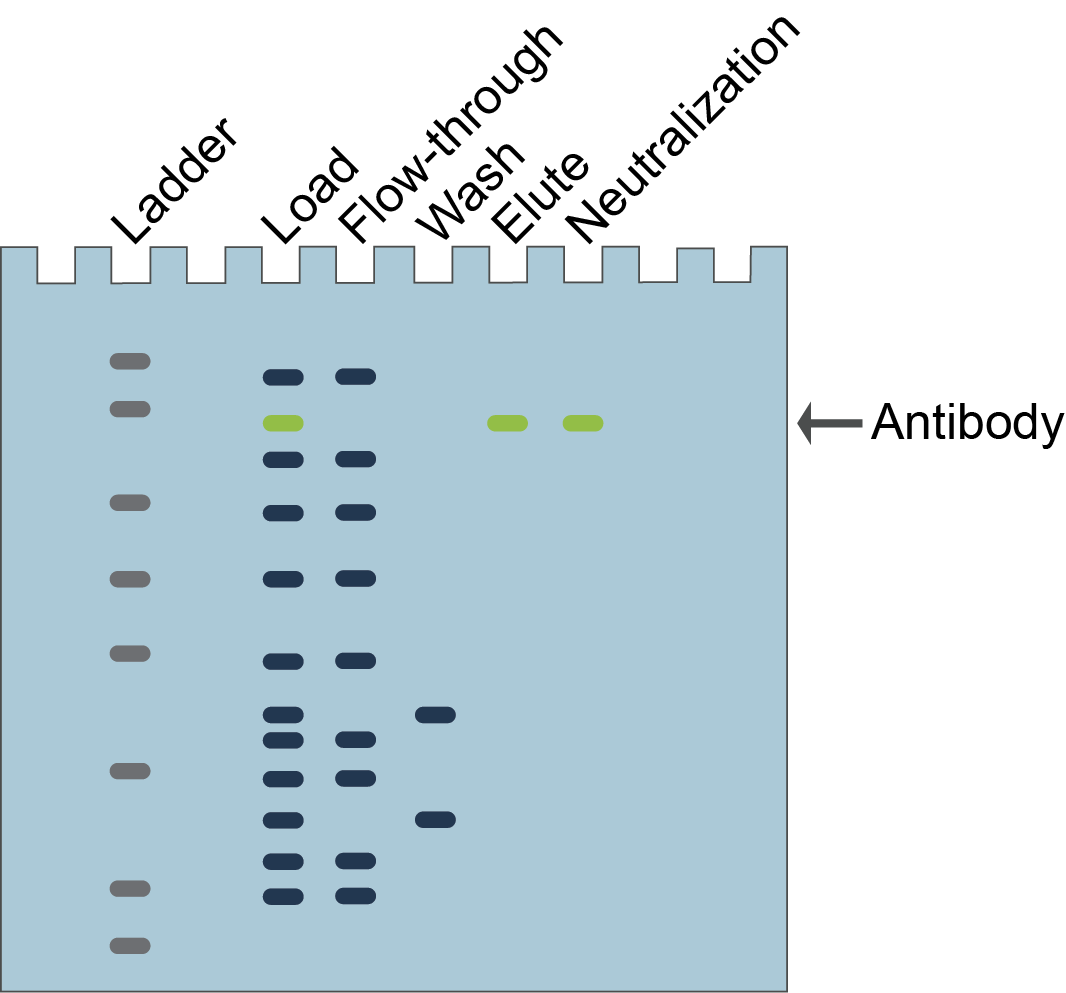
Figure 2.
Example of a hypothetical SDS-PAGE gel for antibody purification with Protein
A, G, or L agarose beads. The antibody (green band) will elute from the column
and be in the neutralized solution whereas the other proteins will separate in
the flow-through and wash fractions.
Quantifying your antibody will let you know what its concentration is and what the total yield of the purification is. Remember, protein purification is an iterative process. If you purified any protein – that is a success! Use the SDS-PAGE gel as a clue to let you know how you might optimize the purification if you do it again in the future. And use the quantification to benchmark whether future changes improve, reduce, or have no impact on antibody yield.
Protein A and Protein G Troubleshooting Guide
Affinity Comparison of Protein A and Protein G for Various Antibody Classes
Imura, Y., Tagawa, T., Miyamoto, Y., Nonoyama, S., Sumichika, H., Fujino, Y., Yamanouchi, M., & Miki, H. (2021). Washing with alkaline solutions in protein A purification improves physicochemical properties of monoclonal antibodies. Scientific reports, 11(1), 1827. https://doi.org/10.1038/s41598-021-81366-6
Liu, H. F., Ma, J., Winter, C., & Bayer, R. (2010). Recovery and purification process development for monoclonal antibody production. mAbs, 2(5), 480–499. https://doi.org/10.4161/mabs.2.5.12645
Sheng, S., & Kong, F. (2012). Separation of antigens and antibodies by immunoaffinity chromatography. Pharmaceutical biology, 50(8), 1038–1044. https://doi.org/10.3109/13880209.2011.653493
Zarrineh, M., Mashhadi, I. S., Farhadpour, M., & Ghassempour, A. (2020). Mechanism of antibodies purification by protein A. Analytical biochemistry, 609, 113909. https://doi.org/10.1016/j.ab.2020.113909

Antibiotics and cell selection agents are used to isolate cells that contain a particular resistance marker from a mixed population. These powerful reagents are used...

During my undergraduate internship I was making different formulations of insulin nanoparticles that would, in theory, be delivered through an inhaler and into the lungs....

The cell selection agents puromycin, blasticidin, hygromycin and G418 kill prokaryotic and eukaryotic cells by inhibiting protein translation. Deciding which selection agent, and how much...

In the microscopic world, different species of bacteria and fungi are engaged in a never-ending turf war, fighting to defend their territory and to advance...