You hold up a bottle of old antibiotic stock solution and wonder if it's still good? Learn how to quickly determine whether your old antibiotic solutions are still good to use.
It happens to us all on occasion – an urgent craving attacks, and it must be addressed immediately. Naturally, to get your fix in this situation, you make your way to the kitchen, about to bake some mouthwatering brownies. As you swiftly set the ingredients on the counter, you pull a nearly empty carton of eggs out of the refrigerator. You look at the expiration date, and your stomach drops because you see you’re three weeks past expiration. Are your eggs still good, or are they spoiled. It might be a risk to cook with them, but you must have those brownies. Thankfully, you are quickly rescued by the realization that eggs have a grace period, and there is an easy way to test whether or not your eggs are still good
Like the baking scenario, this also occurs in the lab with old
antibiotic powders and stock solutions. As you get excited to move on to the next step, you hope that old solution is still good. Testing the efficacy of your antibiotics requires a little more work than testing eggs, but it’s better than throwing out perfectly good material or using bad material.
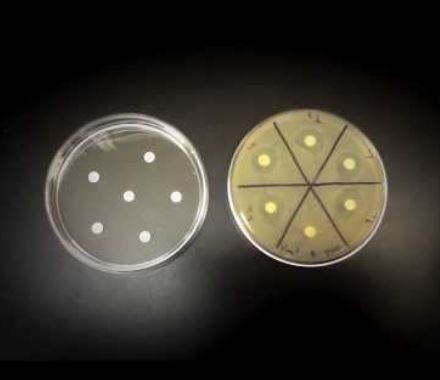
GoldBio offers a video tutorial that walks you through how to test the stability of your antibiotics. This procedure evaluates whether your old antibiotic solutions or powders are salvageable.
Rather than going through the steps addressed in the video, this article will just highlight important things to consider so you’re prepared to test when the time comes.
First, it’s important to make sure you have the right supplies in your lab’s inventory. Keep this list handy because you will need to have the following in your inventory to perform this process:
- 6 mm filter paper discs
- Sterile petri dishes
- Agar plates lacking antibiotic
- Sensitive and resistant bacterial cultures at mid log phase
- Control antibiotic and test antibiotic (your good egg and your bad egg).
Another thing to keep in mind is the time constraints for this procedure. Here, you have to consider colony growth times, drying times and actual procedure times. The time it takes to complete each step is mentioned in the video; however, here is a list to serve as a quick reference:
- Grow two bacterial cultures overnight: one colony that is susceptible and one that is resistant.
- Allow three hours for filter paper discs to dry.
- The drying process can be reduced to 30 minutes if the petri dish holding the discs is left open under a sterile flow hood.
- The test requires an overnight (16-20 hours) incubation before you can evaluate the effectiveness of your antibiotics.
- You will also want to consider the time it will take to prepare stock solution if you’re testing powder, and the time required for the actual process, which depends on how you work.
Whether you’re looking forward to some gooey brownies or the next step in your experiment, interruptions can feel absolutely heartbreaking. But knowing how to steer around the obstacles so you can move forward quickly amends everything. Using this article as a quick guide to remain prepared and bookmarking the video for future reference will keep you in even better shape.


